Butterknife使用及源码学习

本篇文章会讲解ButterKnife框架的使用(当前版本为8.6.0),注解的概念用法及分类,并且会通过ButterKnife源码学习更加深入的了解注解。

前言

最近略微有点忙,之前说好的RN实践项目和设计模式的文章一度被搁浅😪,我尽量抓紧点时间吧。趁着周末忙中偷闲,来学习下依赖注解框架butterKnife,当前最新版本为8.6.0,源码github地址为这里

ButterKnife使用

添加依赖

1
2
3
4
dependencies {
compile 'com.jakewharton:butterknife:8.6.0'
annotationProcessor 'com.jakewharton:butterknife-compiler:8.6.0'
}

官方使用示例

1
2
3
4
5
6
7
8
9
10
11
12
13
14
15
16
17
class ExampleActivity extends Activity {
@BindView(R.id.user) EditText username;
@BindView(R.id.pass) EditText password;
@BindString(R.string.login_error) String loginErrorMessage;
@OnClick(R.id.submit) void submit() {
// TODO call server...
}
@Override public void onCreate(Bundle savedInstanceState) {
super.onCreate(savedInstanceState);
setContentView(R.layout.simple_activity);
ButterKnife.bind(this);
// TODO Use fields...
}
}

当然可以使用的注解有很多,下载源码可看到所有可以添加的注解如下

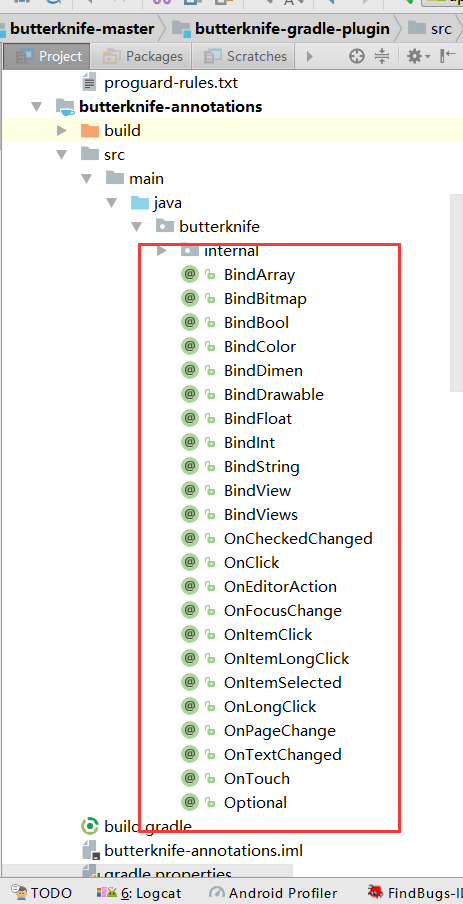
如果以上的注解你觉得使用起来还是不够通畅,还需要在代码中写@bind之类的注解,那么你还可以使用AS插件来辅助注解代码的生成,插件的名字和安装如下图所示
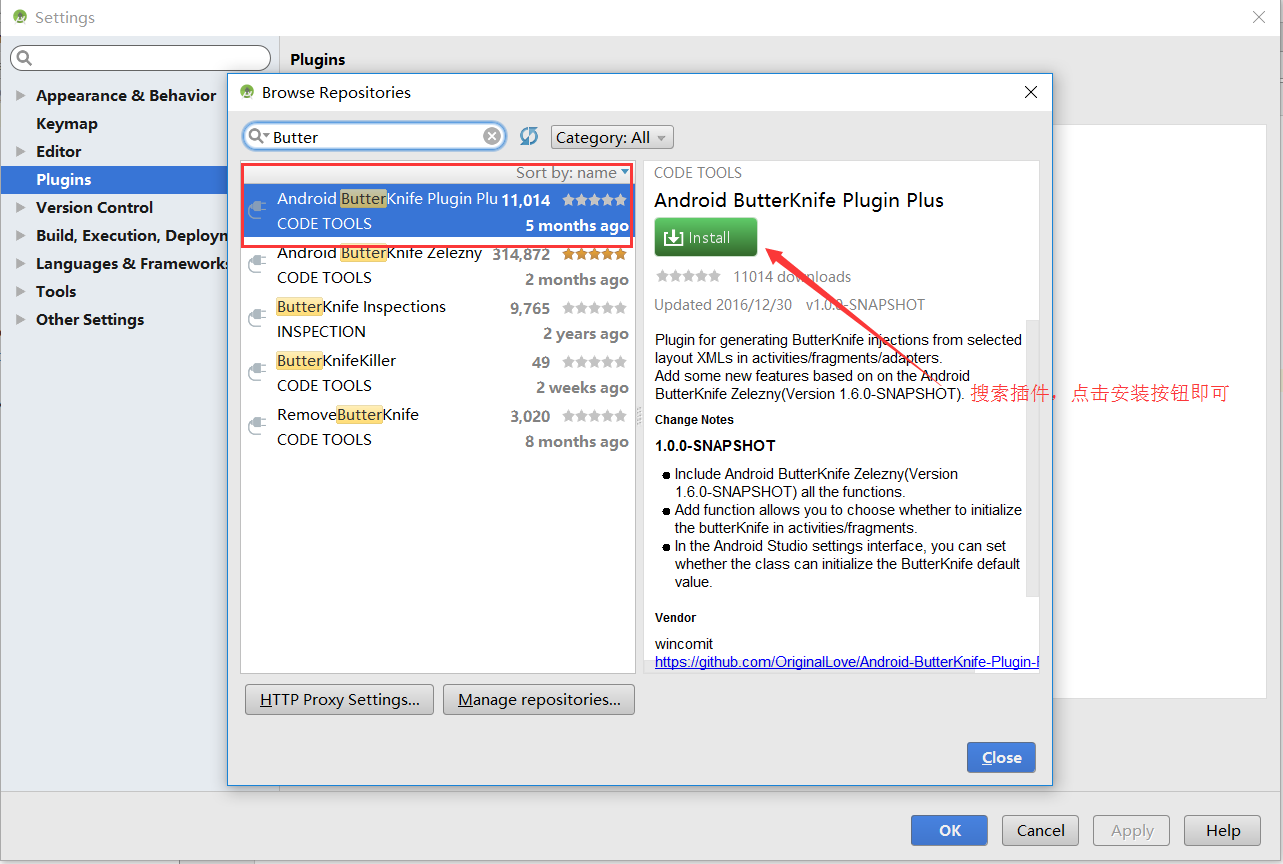
插件的使用,如下图

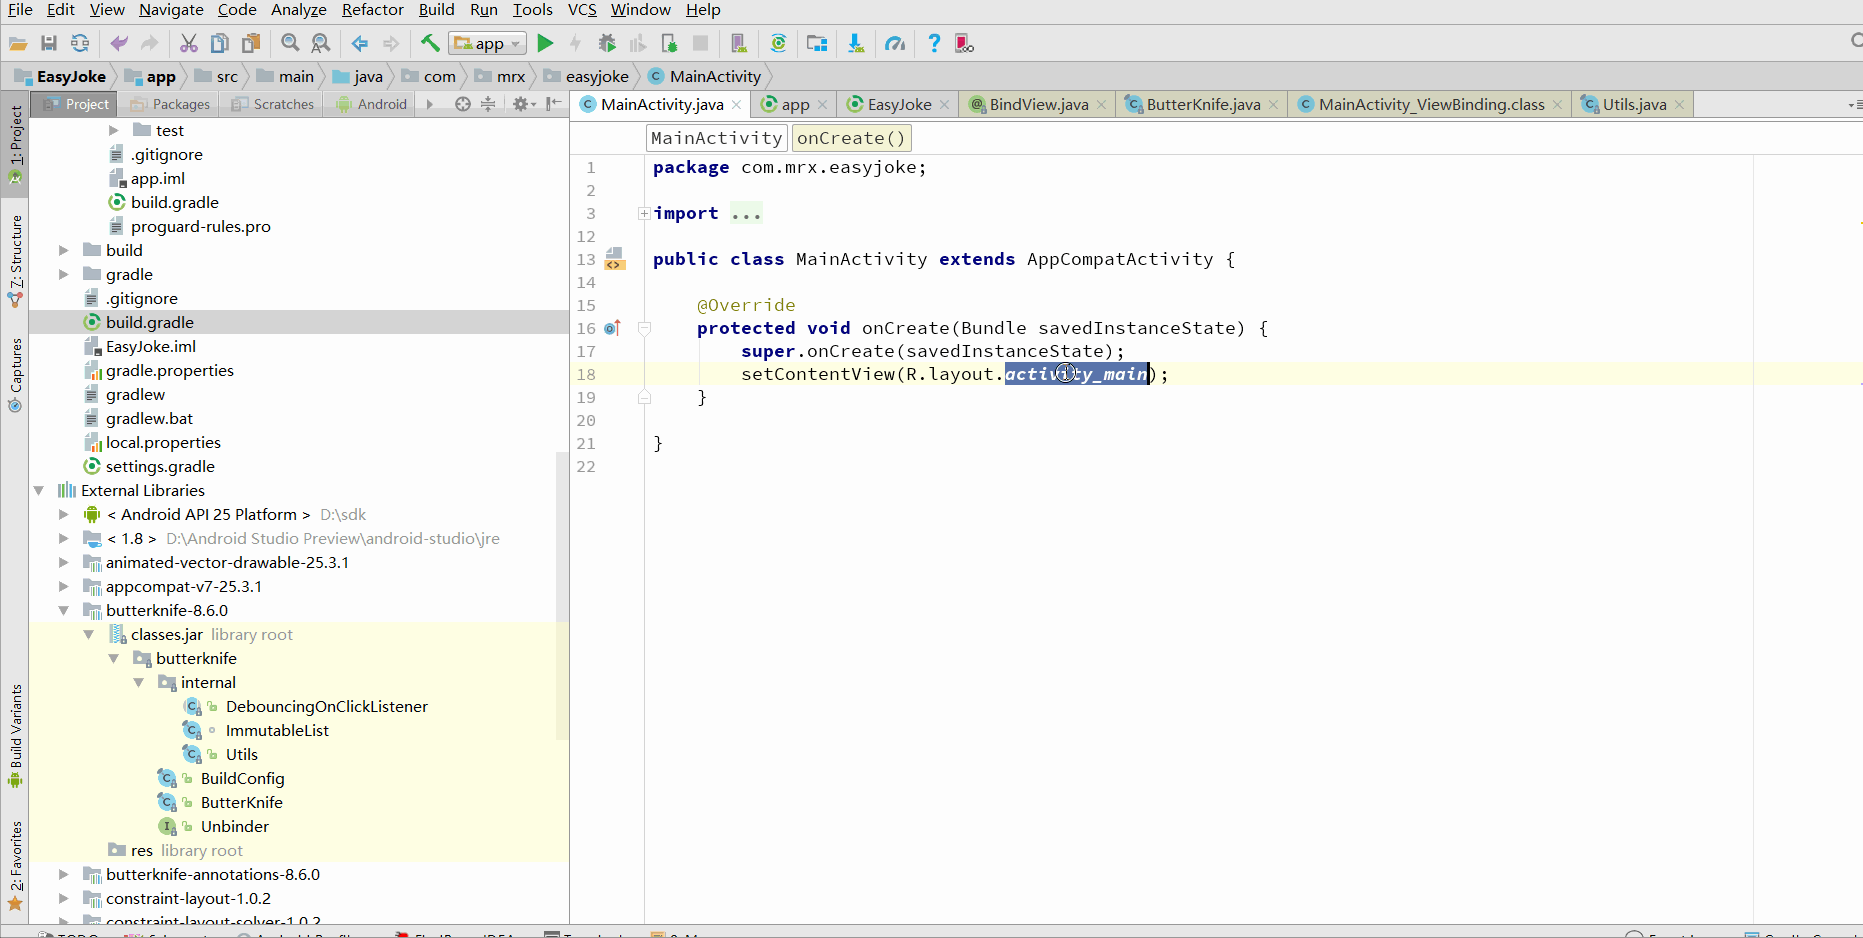
刚开始接触butterKnife的时候,只是觉得使用起来好爽啊,终于告别了findviewbyid这种体力活了,飞一般的感觉。但是butterKnife是如何实现的呢?那么接下来,让我们搞起来吧。致敬大神🙏。

需要了解的知识

下面列出的知识点,如有疑问强烈建议大家查看
1 Java注解
2 Java注解处理器(这里有英文原版)
3 Java反射机制(查看本站Java反射学习实践)
4 android Gradle2.2发布更新提供的annotationProcessor功能(之前的APT)
其实学习完源码之后,你才会了解到JakeWharton大神的英雄池到底有多深!

注解

虽然上面建议大家去了解Java注解和注解处理器相关知识,但是还是决定简单介绍下相关知识吧💕

注解的定义

注解简单来说,存储一些我们需要的数据,在编译时或者运行时调用

注解(也被成为元数据)为我们在代码中添加信息提供了一种形式化的方法,使我们可以在稍后某个时刻非常方便地使用这些数据。 ——————摘自《Thinking in Java》page.620

注解的分类

####按照Java5提供的标准来分类
1 内置注解(三种)

  • @override(大家比较常见)【表示当前方法定义将重写的父类方法,如果编写有误编译器发出错误提示】
  • @Deprecated【表示元素废弃】
  • @SuppressWarnings【关闭编译器警告】

2 元注解(四种)【负责注解其他注解】

  • @Retention
  • @Target
  • @Documented
  • @Inherited

元注解的概念稍微有一点绕,他主要用使用自定义注解时,注解你定义的注解。额 貌似还是一样的感觉,不过可以多敲代码理解下。

@Retention 表示注解将会被运行在什么时期。

用@Retention(RetentionPolicy.CLASS)修饰的注解,表示注解的信息被保留在class文件(字节码文件)中当程序编译时,但不会被虚拟机读取在运行的时候;
用@Retention(RetentionPolicy.SOURCE )修饰的注解,表示注解的信息会被编译器抛弃,不会留在class文件中,注解的信息只会留在源文件中;
用@Retention(RetentionPolicy.RUNTIME )修饰的注解,表示注解的信息被保留在class文件(字节码文件)中当程序编译时,会被虚拟机保留在运行时,
@Target 表示注解将被用在什么地方
可用的ElementType参数有:CONSTRUCTOR(构造方法),FIELD(域声明),LOCAL_VARIABLE(局部变量声明),METHOD(方法声明),PACKAGE(包声明),PARAMETER(参数声明),,TYPE(类,接口,或enum)

如果你想要你的注解在运行时起作用,并且只能修饰一个类,那你可以这样定义

1
2
3
4
5
6
@Retention(RetentionPolicy.RUNTIME)
@Target(ElementType.TYPE)
public @interface MyAnnotation {
String value();
}

@interface 是你在定义注解的时候必须在类的开头使用的限定符

按照取值的方式分类

1 运行时注解
在程序运行时可以使用。如何在运行时使用呢?当然是利用反射。retrofit框架如果查看过源码,你会发现它使用的就是运行时注解。

2 编译时注解
反射由于它的消耗较大,所以一直以来被诟病,所以。。。,那么如何使用编译时注解呢?那么下面需要了解下注解处理器的概念

注解处理器(本小节摘自Jlog`s Java注解处理器)

注解处理器概念

注解处理器(Annotation Processor)是javac的一个工具,它用来在编译时扫描和处理注解(Annotation)。你可以对自定义注解,并注册相应的注解处理器。

注解处理器的作用

一个注解的注解处理器,以Java代码(或者编译过的字节码)作为输入,生成文件(通常是.java文件)作为输出。这具体的含义什么呢?你可以生成Java代码!这些生成的Java代码是在生成的.java文件中,所以你不能修改已经存在的Java类,例如向已有的类中添加方法。这些生成的Java文件,会同其他普通的手动编写的Java源代码一样被javac编译。

虚处理器AbstractProcessor

1
2
3
4
5
6
7
8
9
10
11
12
13
14
15
public class MyProcessor extends AbstractProcessor {
@Override
public synchronized void init(ProcessingEnvironment env){ }
@Override
public boolean process(Set<? extends TypeElement> annoations, RoundEnvironment env) { }
@Override
public Set<String> getSupportedAnnotationTypes() { }
@Override
public SourceVersion getSupportedSourceVersion() { }
}
  • init(ProcessingEnvironment env): 每一个注解处理器类都必须有一个空的构造函数。然而,这里有一个特殊的init()方法,它会被注解处理工具调用,并输入ProcessingEnviroment参数。ProcessingEnviroment提供很多有用的工具类Elements, Types和Filer。后面我们将看到详细的内容。
  • process(Set<? extends TypeElement> annotations, RoundEnvironment env): 这相当于每个处理器的主函数main()。你在这里写你的扫描、评估和处理注解的代码,以及生成Java文件。输入参数RoundEnviroment,可以让你查询出包含特定注解的被注解元素。后面我们将看到详细的内容。
  • getSupportedAnnotationTypes(): 这里你必须指定,这个注解处理器是注册给哪个注解的。注意,它的返回值是一个字符串的集合,包含本处理器想要处理的注解类型的合法全称。换句话说,你在这里定义你的注解处理器注册到哪些注解上。
  • getSupportedSourceVersion(): 用来指定你使用的Java版本。通常这里返回SourceVersion.latestSupported()。然而,如果你有足够的理由只支持Java 6的话,你也可以返回SourceVersion.RELEASE_6。我推荐你使用前者。

注册处理器

你可能会问,我怎样将处理器MyProcessor注册到javac中。你必须提供一个.jar文件。就像其他.jar文件一样,你打包你的注解处理器到此文件中。并且,在你的jar中,你需要打包一个特定的文件javax.annotation.processing.Processor到META-INF/services路径下。所以,你的.jar文件看起来就像下面这样:

  • MyProcessor.jar
    • com
      • example
        • MyProcessor.class
    • META-INF
      • services
        • javax.annotation.processing.Processor

打包进MyProcessor.jar中的javax.annotation.processing.Processor的内容是,注解处理器的合法的全名列表,每一个元素换行分割:

1
com.example.MyProcessor

把MyProcessor.jar放到你的builpath中,javac会自动检查和读取javax.annotation.processing.Processor中的内容,并且注册MyProcessor作为注解处理器。
若对上述概念有疑问,请查看原文链接

其实如果看到这里,我猜你会说TMD,没见你分析一句源码就在撤这些概念了,兄弟放下西瓜刀,先听我说,其实如果上述概念你都明白了,那么ButterKnife的源码你阅读起来完全毫无压力。

ButterKnife源码项目结构

开始我们的源码分析,首先,源代码项目结构见下图

可以看到项目结构十分的明确🤸

  • 蓝色框圈起的项目为android library
  • 红色框圈起的项目为Java library
  • 黄色框圈起的项目为demo

A 蓝色框的项目我们在dependencies中添加。提供给我们使用的API。

B 红色框的项目比较多,依次来解释

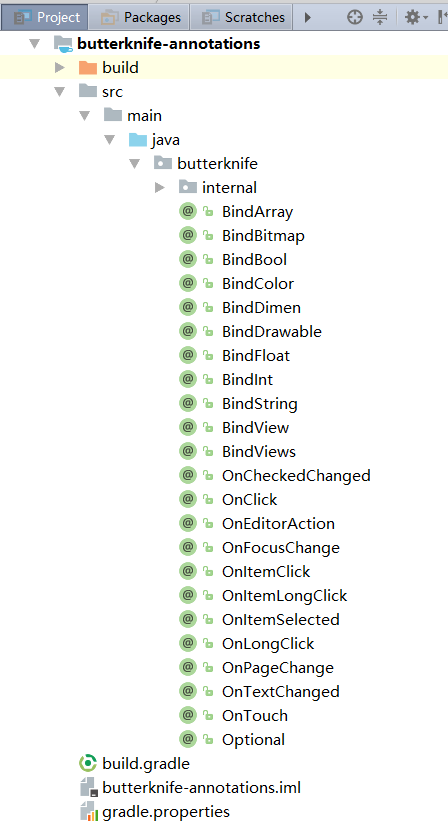
  • butterknife-annotations; 定义的注解(项目结构见下图)
  • butterknife-compiler;编译时用到的注解的处理器(important),细心的同学可能发现我们在项目中使用butterKnife时添加依赖的时候导入的就有这个项目
  • butterknife-gradle-plugin;自定义的gradle插件,辅助生成有关代码
  • butterknife-lint;项目的lint检查

C 黄色框内的demo项目暂时就不多做解释,相信大家都能看懂

ButterKnife源码学习

开始我们的正式的学习吧!
新建工程,添加ButterKnife依赖,界面很简单,包含一个TextView和IamgeView,使用ButterKnife进行注解。项目代码如下

一键生成真的是麻瓜式编程了~.~
控件的初始化和点击事件都已成功绑定了,在setContentView(…)下,多出了ButterKnife.bind(this);

@BindView

让我们首先查看下@BindView的注解是如何定义的吧。点击进入源码查看

1
2
3
4
5
@Retention(CLASS) @Target(FIELD)
public @interface BindView {
/** View ID to which the field will be bound. */
@IdRes int value();
}

通过上一节注解知识的学习,我们知道当前注解为编译时注解只注解参数喽,既然是编译时注解那么肯定存在注解处理器。我们在添加依赖的时候你就会发现除了ButterKnife的依赖,你同时也添加了注解处理器依赖

1
`annotationProcessor 'com.jakewharton:butterknife-compiler:8.6.0'`

AbstractProcessor注解处理器

了解完@BindView源码后,接着让我们来查看下注解处理器是如何编写的。
ButterKnifeProcessor类的源码较长,这里就不贴出来了,会跳出主要的方法进行分析,如果需要,类路径为butterknife.compiler.ButterKnifeProcessor可自行查看。

  • 1先来查看init()方法
1
2
3
4
5
6
7
8
9
10
11
12
13
14
15
16
17
18
19
20
21
22
23
@Override public synchronized void init(ProcessingEnvironment env) {
super.init(env);
String sdk = env.getOptions().get(OPTION_SDK_INT);
if (sdk != null) {
try {
this.sdk = Integer.parseInt(sdk);
} catch (NumberFormatException e) {
env.getMessager()
.printMessage(Kind.WARNING, "Unable to parse supplied minSdk option '"
+ sdk
+ "'. Falling back to API 1 support.");
}
}
elementUtils = env.getElementUtils();
typeUtils = env.getTypeUtils();
filer = env.getFiler();
try {
trees = Trees.instance(processingEnv);
} catch (IllegalArgumentException ignored) {
}
}

首先看到的就是各种try{}catch(){},由此可见一个好的框架容错是真的厉害,基本上大部分的代码都是来处理兼容。此方法中主要获取了一些辅助类,包括元素辅助类,类型辅助类,文件辅助类等。

  • 2接着查看process()方法。
1
2
3
4
5
6
7
8
9
10
11
12
13
14
15
16
17
@Override public boolean process(Set<? extends TypeElement> elements, RoundEnvironment env) {
Map<TypeElement, BindingSet> bindingMap = findAndParseTargets(env);
for (Map.Entry<TypeElement, BindingSet> entry : bindingMap.entrySet()) {
TypeElement typeElement = entry.getKey();
BindingSet binding = entry.getValue();
JavaFile javaFile = binding.brewJava(sdk);
try {
javaFile.writeTo(filer);
} catch (IOException e) {
error(typeElement, "Unable to write binding for type %s: %s", typeElement, e.getMessage());
}
}
return false;
}

这个方法就比较重要了,但是代码确如此的简单🙃,首先调用了findAndParseTargets方法返回一个Map值存放元素和对应的Bindingset,至于BindingSet是什么,暂且不表,然后遍历Map获得各个元素(注解),调用javapoet库提供的方法自动生成java类(若需了解javapoet可自行学习)。

首先我们来查看findAndParseTargets方法,

1
2
3
4
5
6
7
8
9
10
11
12
13
14
15
16
17
18
19
20
21
22
23
24
25
26
27
28
29
30
31
32
33
34
35
36
37
38
39
40
41
42
43
44
45
46
47
48
49
50
51
52
53
54
55
56
57
58
59
60
61
62
63
64
65
66
67
68
69
70
71
72
73
74
75
76
77
78
79
80
81
82
83
84
85
86
87
88
89
90
91
92
93
94
95
96
97
98
99
100
101
102
103
104
105
106
107
108
109
110
111
112
113
114
115
116
117
118
119
120
121
122
123
124
125
126
127
128
129
130
131
132
133
134
135
136
137
138
139
140
141
142
143
144
145
146
147
148
149
150
151
private Map<TypeElement, BindingSet> findAndParseTargets(RoundEnvironment env) {
Map<TypeElement, BindingSet.Builder> builderMap = new LinkedHashMap<>();
Set<TypeElement> erasedTargetNames = new LinkedHashSet<>();
scanForRClasses(env);
// Process each @BindArray element.
for (Element element : env.getElementsAnnotatedWith(BindArray.class)) {
if (!SuperficialValidation.validateElement(element)) continue;
try {
parseResourceArray(element, builderMap, erasedTargetNames);
} catch (Exception e) {
logParsingError(element, BindArray.class, e);
}
}
// Process each @BindBitmap element.
for (Element element : env.getElementsAnnotatedWith(BindBitmap.class)) {
if (!SuperficialValidation.validateElement(element)) continue;
try {
parseResourceBitmap(element, builderMap, erasedTargetNames);
} catch (Exception e) {
logParsingError(element, BindBitmap.class, e);
}
}
// Process each @BindBool element.
for (Element element : env.getElementsAnnotatedWith(BindBool.class)) {
if (!SuperficialValidation.validateElement(element)) continue;
try {
parseResourceBool(element, builderMap, erasedTargetNames);
} catch (Exception e) {
logParsingError(element, BindBool.class, e);
}
}
// Process each @BindColor element.
for (Element element : env.getElementsAnnotatedWith(BindColor.class)) {
if (!SuperficialValidation.validateElement(element)) continue;
try {
parseResourceColor(element, builderMap, erasedTargetNames);
} catch (Exception e) {
logParsingError(element, BindColor.class, e);
}
}
// Process each @BindDimen element.
for (Element element : env.getElementsAnnotatedWith(BindDimen.class)) {
if (!SuperficialValidation.validateElement(element)) continue;
try {
parseResourceDimen(element, builderMap, erasedTargetNames);
} catch (Exception e) {
logParsingError(element, BindDimen.class, e);
}
}
// Process each @BindDrawable element.
for (Element element : env.getElementsAnnotatedWith(BindDrawable.class)) {
if (!SuperficialValidation.validateElement(element)) continue;
try {
parseResourceDrawable(element, builderMap, erasedTargetNames);
} catch (Exception e) {
logParsingError(element, BindDrawable.class, e);
}
}
// Process each @BindFloat element.
for (Element element : env.getElementsAnnotatedWith(BindFloat.class)) {
if (!SuperficialValidation.validateElement(element)) continue;
try {
parseResourceFloat(element, builderMap, erasedTargetNames);
} catch (Exception e) {
logParsingError(element, BindFloat.class, e);
}
}
// Process each @BindInt element.
for (Element element : env.getElementsAnnotatedWith(BindInt.class)) {
if (!SuperficialValidation.validateElement(element)) continue;
try {
parseResourceInt(element, builderMap, erasedTargetNames);
} catch (Exception e) {
logParsingError(element, BindInt.class, e);
}
}
// Process each @BindString element.
for (Element element : env.getElementsAnnotatedWith(BindString.class)) {
if (!SuperficialValidation.validateElement(element)) continue;
try {
parseResourceString(element, builderMap, erasedTargetNames);
} catch (Exception e) {
logParsingError(element, BindString.class, e);
}
}
// Process each @BindView element.
for (Element element : env.getElementsAnnotatedWith(BindView.class)) {
// we don't SuperficialValidation.validateElement(element)
// so that an unresolved View type can be generated by later processing rounds
try {
parseBindView(element, builderMap, erasedTargetNames);
} catch (Exception e) {
logParsingError(element, BindView.class, e);
}
}
// Process each @BindViews element.
for (Element element : env.getElementsAnnotatedWith(BindViews.class)) {
// we don't SuperficialValidation.validateElement(element)
// so that an unresolved View type can be generated by later processing rounds
try {
parseBindViews(element, builderMap, erasedTargetNames);
} catch (Exception e) {
logParsingError(element, BindViews.class, e);
}
}
// Process each annotation that corresponds to a listener.
for (Class<? extends Annotation> listener : LISTENERS) {
findAndParseListener(env, listener, builderMap, erasedTargetNames);
}
// Associate superclass binders with their subclass binders. This is a queue-based tree walk
// which starts at the roots (superclasses) and walks to the leafs (subclasses).
Deque<Map.Entry<TypeElement, BindingSet.Builder>> entries =
new ArrayDeque<>(builderMap.entrySet());
Map<TypeElement, BindingSet> bindingMap = new LinkedHashMap<>();
while (!entries.isEmpty()) {
Map.Entry<TypeElement, BindingSet.Builder> entry = entries.removeFirst();
TypeElement type = entry.getKey();
BindingSet.Builder builder = entry.getValue();
TypeElement parentType = findParentType(type, erasedTargetNames);
if (parentType == null) {
bindingMap.put(type, builder.build());
} else {
BindingSet parentBinding = bindingMap.get(parentType);
if (parentBinding != null) {
builder.setParent(parentBinding);
bindingMap.put(type, builder.build());
} else {
// Has a superclass binding but we haven't built it yet. Re-enqueue for later.
entries.addLast(entry);
}
}
}
return bindingMap;
}

这里根据不同元素类型,调用不同的pareseBind..方法,我们仅仅查看和BindView相关的代码,其他部分代码原理相似。

1
2
3
4
5
6
7
8
9
10
// Process each @BindView element.
for (Element element : env.getElementsAnnotatedWith(BindView.class)) {
// we don't SuperficialValidation.validateElement(element)
// so that an unresolved View type can be generated by later processing rounds
try {
parseBindView(element, builderMap, erasedTargetNames);
} catch (Exception e) {
logParsingError(element, BindView.class, e);
}
}

接着看调用了pareseBindView

1
2
3
4
5
6
7
8
9
10
11
12
13
14
15
16
17
18
19
20
21
22
23
24
25
26
27
28
29
30
31
32
33
34
35
36
37
38
39
40
41
42
43
44
45
46
47
48
49
50
51
52
53
54
55
56
57
58
private void parseBindView(Element element, Map<TypeElement, BindingSet.Builder> builderMap,
Set<TypeElement> erasedTargetNames) {
TypeElement enclosingElement = (TypeElement) element.getEnclosingElement();
// Start by verifying common generated code restrictions.
boolean hasError = isInaccessibleViaGeneratedCode(BindView.class, "fields", element)
|| isBindingInWrongPackage(BindView.class, element);
// Verify that the target type extends from View.
TypeMirror elementType = element.asType();
if (elementType.getKind() == TypeKind.TYPEVAR) {
TypeVariable typeVariable = (TypeVariable) elementType;
elementType = typeVariable.getUpperBound();
}
Name qualifiedName = enclosingElement.getQualifiedName();
Name simpleName = element.getSimpleName();
if (!isSubtypeOfType(elementType, VIEW_TYPE) && !isInterface(elementType)) {
if (elementType.getKind() == TypeKind.ERROR) {
note(element, "@%s field with unresolved type (%s) "
+ "must elsewhere be generated as a View or interface. (%s.%s)",
BindView.class.getSimpleName(), elementType, qualifiedName, simpleName);
} else {
error(element, "@%s fields must extend from View or be an interface. (%s.%s)",
BindView.class.getSimpleName(), qualifiedName, simpleName);
hasError = true;
}
}
if (hasError) {
return;
}
// Assemble information on the field.
int id = element.getAnnotation(BindView.class).value();
BindingSet.Builder builder = builderMap.get(enclosingElement);
QualifiedId qualifiedId = elementToQualifiedId(element, id);
if (builder != null) {
String existingBindingName = builder.findExistingBindingName(getId(qualifiedId));
if (existingBindingName != null) {
error(element, "Attempt to use @%s for an already bound ID %d on '%s'. (%s.%s)",
BindView.class.getSimpleName(), id, existingBindingName,
enclosingElement.getQualifiedName(), element.getSimpleName());
return;
}
} else {
builder = getOrCreateBindingBuilder(builderMap, enclosingElement);
}
String name = simpleName.toString();
TypeName type = TypeName.get(elementType);
boolean required = isFieldRequired(element);
builder.addField(getId(qualifiedId), new FieldViewBinding(name, type, required));
// Add the type-erased version to the valid binding targets set.
erasedTargetNames.add(enclosingElement);
}

上来就又是各种校验代码。这些都不重要,哦!不对第一句

1
boolean hasError = isInaccessibleViaGeneratedCode(BindView.class, "fields", element)|| isBindingInWrongPackage(BindView.class, element);

校验了修饰符,如果存在static private则抛异常,所以说我们在自己写注解的时候,要注意修饰符。
比较重要的地方有

1
builder = getOrCreateBindingBuilder(builderMap, enclosingElement);

此方法中调用了getOrCreateBindingBuilder方法

1
2
3
4
5
6
7
8
9
private BindingSet.Builder getOrCreateBindingBuilder(
Map<TypeElement, BindingSet.Builder> builderMap, TypeElement enclosingElement) {
BindingSet.Builder builder = builderMap.get(enclosingElement);
if (builder == null) {
builder = BindingSet.newBuilder(enclosingElement);
builderMap.put(enclosingElement, builder);
}
return builder;
}

BuilderSet出现在这里,那么让我们查看BuilderSet创建调用的方法newBuilder代码如下

1
2
3
4
5
6
7
8
9
10
11
12
13
14
15
16
17
18
19
20
static Builder newBuilder(TypeElement enclosingElement) {
TypeMirror typeMirror = enclosingElement.asType();
boolean isView = isSubtypeOfType(typeMirror, VIEW_TYPE);
boolean isActivity = isSubtypeOfType(typeMirror, ACTIVITY_TYPE);
boolean isDialog = isSubtypeOfType(typeMirror, DIALOG_TYPE);
TypeName targetType = TypeName.get(typeMirror);
if (targetType instanceof ParameterizedTypeName) {
targetType = ((ParameterizedTypeName) targetType).rawType;
}
String packageName = getPackage(enclosingElement).getQualifiedName().toString();
String className = enclosingElement.getQualifiedName().toString().substring(
packageName.length() + 1).replace('.', '$');
ClassName bindingClassName = ClassName.get(packageName, className + "_ViewBinding");
boolean isFinal = enclosingElement.getModifiers().contains(Modifier.FINAL);
return new Builder(targetType, bindingClassName, isFinal, isView, isActivity, isDialog);
}

创建了一个builder,builder含有的参数有targetType,bindingClassName,isFinal,isView,isActivity,isDialog。参数中的bindingClassName生成需要注意下

1
ClassName bindingClassName = ClassName.get(packageName, className + "_ViewBinding");

下面就是从map中(有则取缓存,没有则创建),取出被注解变量的名称,类型,id等保存到生成的FieldViewBinding实体中,并将实体保存到build中。ok,抽根93年的雪茄压压惊。
gogogogo
接下来我们查看process()中的其他方法,

1
2
3
4
5
6
7
8
9
10
11
for (Map.Entry<TypeElement, BindingSet> entry : bindingMap.entrySet()) {
TypeElement typeElement = entry.getKey();
BindingSet binding = entry.getValue();
JavaFile javaFile = binding.brewJava(sdk);
try {
javaFile.writeTo(filer);
} catch (IOException e) {
error(typeElement, "Unable to write binding for type %s: %s", typeElement, e.getMessage());
}
}

通过BindingSet获得binding,调用binding.brewJava(sdk);方法生成javaFile,通过JavaFile生成了java类,来查看下brewJava方法

1
2
3
4
5
JavaFile brewJava(int sdk) {
return JavaFile.builder(bindingClassName.packageName(), createType(sdk))
.addFileComment("Generated code from Butter Knife. Do not modify!")
.build();
}

这里的bindingClassName就是上面分析的newBuilder方法中赋值的bindingClassName.

1
ClassName bindingClassName = ClassName.get(packageName, className + "_ViewBinding");

也就是说会生成一个后缀名为_ViewBinding的java类。这个类位于在/build/generated/source/apt/debud/xxxx/目录下,xxx是你对应的包名。
下面为之前demo编译后生成的后缀名为_ViewBinding的java类

1
2
3
4
5
6
7
8
9
10
11
12
13
14
15
16
17
18
19
20
21
22
23
24
25
26
27
28
29
30
31
32
33
34
35
36
37
38
39
40
41
42
43
44
45
46
47
48
49
50
51
52
53
public class MainActivity_ViewBinding implements Unbinder {
private MainActivity target;
private View view2131427422;
private View view2131427423;
@UiThread
public MainActivity_ViewBinding(MainActivity target) {
this(target, target.getWindow().getDecorView());
}
@UiThread
public MainActivity_ViewBinding(final MainActivity target, View source) {
this.target = target;
View view;
view = Utils.findRequiredView(source, R.id.testTv, "field 'testTv' and method 'onViewClicked'");
target.testTv = Utils.castView(view, R.id.testTv, "field 'testTv'", TextView.class);
view2131427422 = view;
view.setOnClickListener(new DebouncingOnClickListener() {
@Override
public void doClick(View p0) {
target.onViewClicked(p0);
}
});
view = Utils.findRequiredView(source, R.id.testIv, "field 'testIv' and method 'onViewClicked'");
target.testIv = Utils.castView(view, R.id.testIv, "field 'testIv'", ImageView.class);
view2131427423 = view;
view.setOnClickListener(new DebouncingOnClickListener() {
@Override
public void doClick(View p0) {
target.onViewClicked(p0);
}
});
}
@Override
@CallSuper
public void unbind() {
MainActivity target = this.target;
if (target == null) throw new IllegalStateException("Bindings already cleared.");
this.target = null;
target.testTv = null;
target.testIv = null;
view2131427422.setOnClickListener(null);
view2131427422 = null;
view2131427423.setOnClickListener(null);
view2131427423 = null;
}
}

那么这个类是如何被调用的呢?
骚年上面我们分析了注解的生成但是有一个重要的方法被忽视了,算了,我还是重新贴下之前我们创建的项目代码吧,太长了省得大家找了

1
2
3
4
5
6
7
8
9
10
11
12
13
14
15
16
17
18
19
20
21
22
23
24
public class MainActivity extends AppCompatActivity {
@BindView(R.id.testTv)
TextView testTv;
@BindView(R.id.testIv)
ImageView testIv;
@Override
protected void onCreate(Bundle savedInstanceState) {
super.onCreate(savedInstanceState);
setContentView(R.layout.activity_main);
ButterKnife.bind(this);
}
@OnClick({R.id.testTv, R.id.testIv})
public void onViewClicked(View view) {
switch (view.getId()) {
case R.id.testTv:
break;
case R.id.testIv:
break;
}
}
}

attent please!ButterKnife.bind(this);就是这个方法,来查看下bind方法进行了什么样的骚作吧,

1
2
3
4
5
6
7
8
9
10
11
12
13
14
15
16
17
18
19
20
21
22
23
24
25
26
27
28
29
30
31
32
33
34
35
36
@NonNull @UiThread
public static Unbinder bind(@NonNull Activity target) {
View sourceView = target.getWindow().getDecorView();
return createBinding(target, sourceView);
}
```
调用了createBinding方法,继续
```Java
private static Unbinder createBinding(@NonNull Object target, @NonNull View source) {
Class<?> targetClass = target.getClass();
if (debug) Log.d(TAG, "Looking up binding for " + targetClass.getName());
Constructor<? extends Unbinder> constructor = findBindingConstructorForClass(targetClass);
if (constructor == null) {
return Unbinder.EMPTY;
}
//noinspection TryWithIdenticalCatches Resolves to API 19+ only type.
try {
return constructor.newInstance(target, source);
} catch (IllegalAccessException e) {
throw new RuntimeException("Unable to invoke " + constructor, e);
} catch (InstantiationException e) {
throw new RuntimeException("Unable to invoke " + constructor, e);
} catch (InvocationTargetException e) {
Throwable cause = e.getCause();
if (cause instanceof RuntimeException) {
throw (RuntimeException) cause;
}
if (cause instanceof Error) {
throw (Error) cause;
}
throw new RuntimeException("Unable to create binding instance.", cause);
}
}

这里主要看下调用的findBindingConstructorForClass方法,此方法返回了一个Constructor,然后通过反射生成了这个Constructor的实体,那么findBindingConstructorForClass做了什么骚作呢?

1
2
3
4
5
6
7
8
9
10
11
12
13
14
15
16
17
18
19
20
21
22
23
24
25
26
@Nullable @CheckResult @UiThread
private static Constructor<? extends Unbinder> findBindingConstructorForClass(Class<?> cls) {
Constructor<? extends Unbinder> bindingCtor = BINDINGS.get(cls);
if (bindingCtor != null) {
if (debug) Log.d(TAG, "HIT: Cached in binding map.");
return bindingCtor;
}
String clsName = cls.getName();
if (clsName.startsWith("android.") || clsName.startsWith("java.")) {
if (debug) Log.d(TAG, "MISS: Reached framework class. Abandoning search.");
return null;
}
try {
Class<?> bindingClass = cls.getClassLoader().loadClass(clsName + "_ViewBinding");
//noinspection unchecked
bindingCtor = (Constructor<? extends Unbinder>) bindingClass.getConstructor(cls, View.class);
if (debug) Log.d(TAG, "HIT: Loaded binding class and constructor.");
} catch (ClassNotFoundException e) {
if (debug) Log.d(TAG, "Not found. Trying superclass " + cls.getSuperclass().getName());
bindingCtor = findBindingConstructorForClass(cls.getSuperclass());
} catch (NoSuchMethodException e) {
throw new RuntimeException("Unable to find binding constructor for " + clsName, e);
}
BINDINGS.put(cls, bindingCtor);
return bindingCtor;
}

重要的方法

1
2
3
4
5
6
Class<?> bindingClass = cls.getClassLoader().loadClass(clsName + "_ViewBinding");
//noinspection unchecked
bindingCtor = (Constructor<? extends Unbinder>) bindingClass.getConstructor(cls, View.class);
...
BINDINGS.put(cls, bindingCtor);
return bindingCtor;

兄弟如果此处看不太懂,推荐你(查看本站Java反射学习实践)。这里生成的Constructor为后缀名_ViewBinding的java类,即我们在编译时生成的类。也就是说ButterKnife.bind方法会调用_ViewBinding的java类的构造函数,即本此demo中的

1
2
3
4
5
6
7
8
9
10
11
12
13
14
15
16
17
18
19
20
21
22
23
24
@UiThread
public MainActivity_ViewBinding(final MainActivity target, View source) {
this.target = target;
View view;
view = Utils.findRequiredView(source, R.id.testTv, "field 'testTv' and method 'onViewClicked'");
target.testTv = Utils.castView(view, R.id.testTv, "field 'testTv'", TextView.class);
view2131427422 = view;
view.setOnClickListener(new DebouncingOnClickListener() {
@Override
public void doClick(View p0) {
target.onViewClicked(p0);
}
});
view = Utils.findRequiredView(source, R.id.testIv, "field 'testIv' and method 'onViewClicked'");
target.testIv = Utils.castView(view, R.id.testIv, "field 'testIv'", ImageView.class);
view2131427423 = view;
view.setOnClickListener(new DebouncingOnClickListener() {
@Override
public void doClick(View p0) {
target.onViewClicked(p0);
}
});
}

终于看到了熟悉的代码setOnClickListener().这里使用了回调,接着调用Utils中的方法,如下

1
2
3
4
5
6
7
8
9
10
11
12
13
14
15
16
17
18
19
20
21
22
23
24
25
26
27
28
29
30
31
32
33
...
public static View findRequiredView(View source, @IdRes int id, String who) {
View view = source.findViewById(id);
if (view != null) {
return view;
}
String name = getResourceEntryName(source, id);
throw new IllegalStateException("Required view '"
+ name
+ "' with ID "
+ id
+ " for "
+ who
+ " was not found. If this view is optional add '@Nullable' (fields) or '@Optional'"
+ " (methods) annotation.");
}
...
public static <T> T castView(View view, @IdRes int id, String who, Class<T> cls) {
try {
return cls.cast(view);
} catch (ClassCastException e) {
String name = getResourceEntryName(view, id);
throw new IllegalStateException("View '"
+ name
+ "' with ID "
+ id
+ " for "
+ who
+ " was of the wrong type. See cause for more info.", e);
}
}
...

我里个神啊,终于看到findViewById了 心好累。

其实说白了就是使用编译时注解,加动态生成Java类来完成一些重复操作,比如findViewVById和点击事件。但是,老铁,你这个框架源码是写的真的厉害

源码的暂时分析到这里吧,其实分析起来都不太难,主要的是学习源码中的处理问题的方式。当然还有编码风格色剂模式。

参考